TL;DR:
- Incomplete vehicle inspections pose significant legal and financial risks for rental fleet owners, making structured workflows essential. Proper preparation, including essential tools and thorough documentation, ensures accurate condition assessments at pickup and return, reducing disputes. Digital inspection solutions enhance accuracy, accountability, and fleet management visibility, ultimately safeguarding revenue, reputation, and safety.
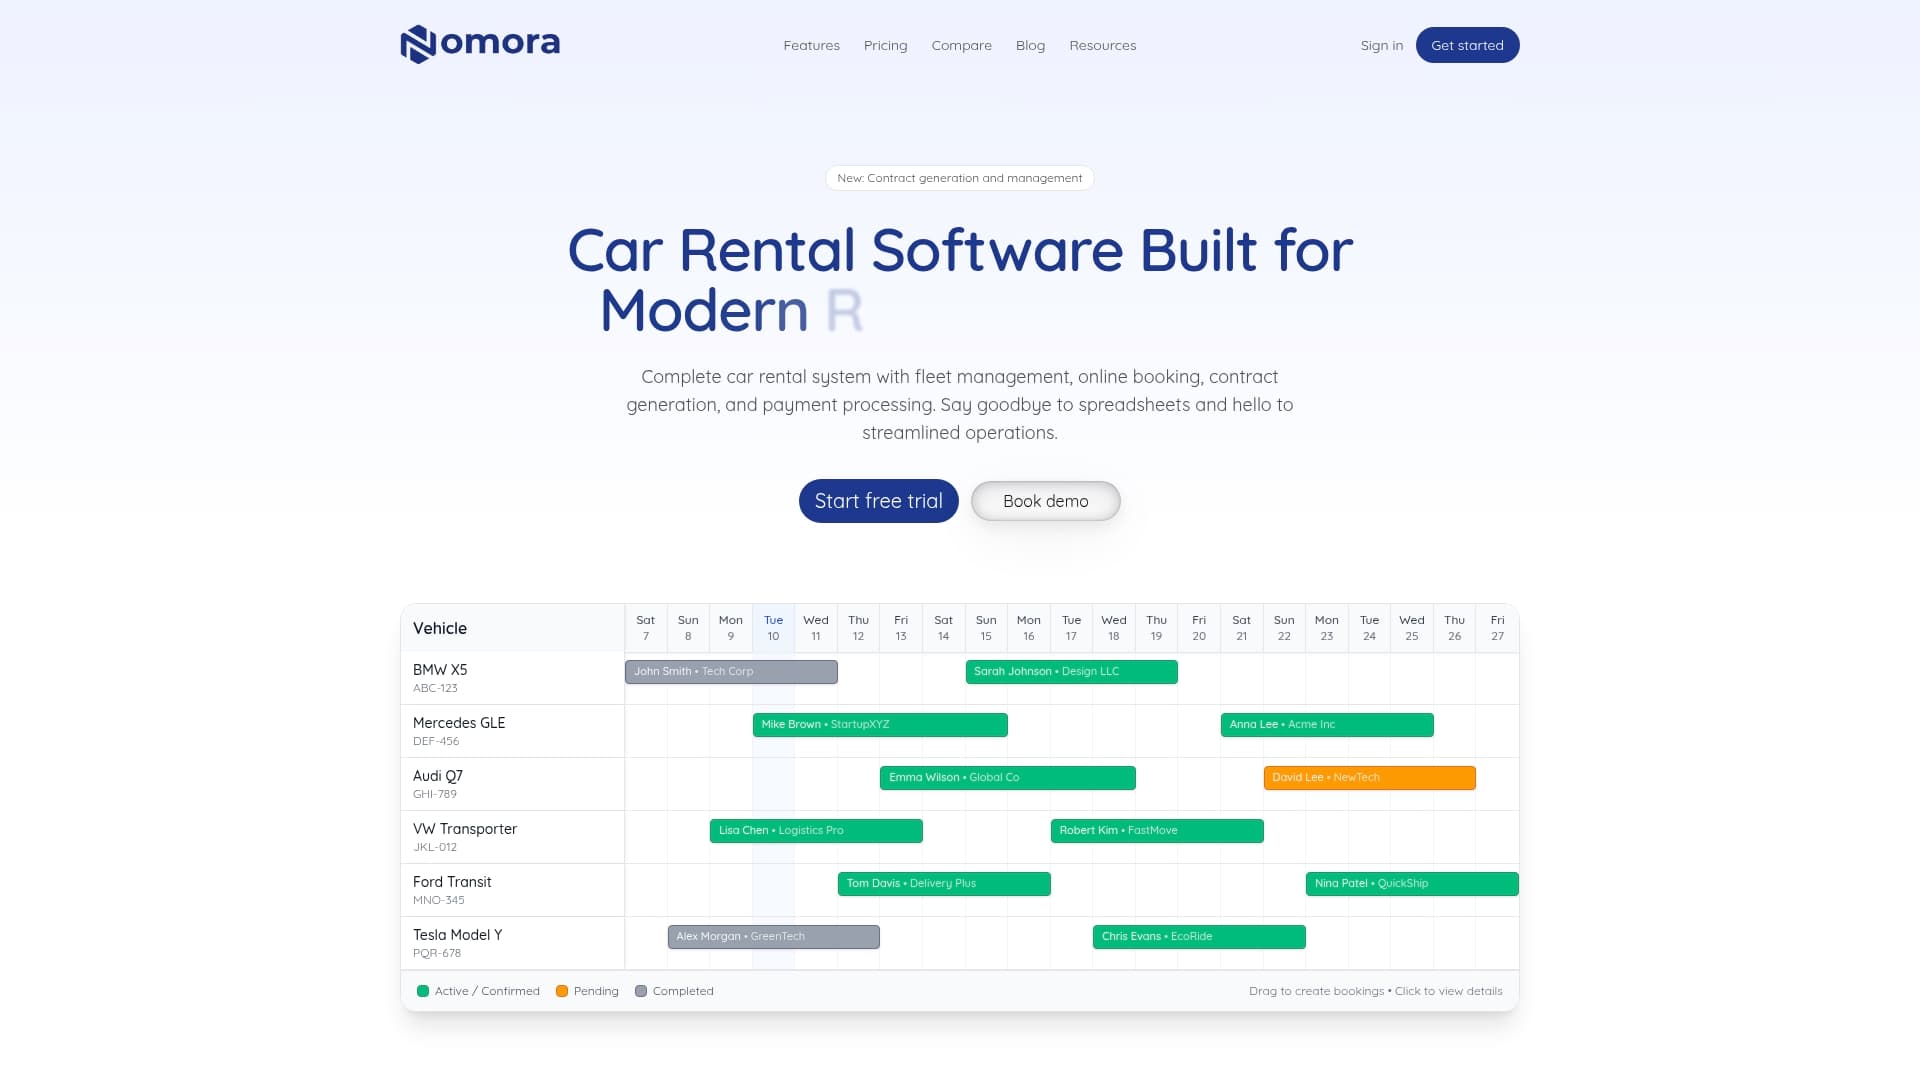
A single missed scratch or an undocumented warning light can turn a routine rental return into an expensive, time-consuming dispute. For rental business owners and fleet managers, incomplete vehicle inspections are not just an inconvenience—they represent real financial and legal exposure. Whether you operate five vehicles or five hundred, a structured inspection workflow that covers both pickup and return, including photos, odometer readings, fuel levels, and a signed condition report, is the single most effective tool for protecting your fleet, your revenue, and your reputation. This guide walks you through exactly how to build and execute that system.
Table of Contents
- What you need before every rental inspection
- Step-by-step inspection process at pickup and return
- Documentation: protecting your business with proof
- Digital solutions: from manual checklists to audit-ready workflows
- Common mistakes and troubleshooting tips
- Why a rental inspection is more than just a checklist
- Streamline your inspections with the right software
- Frequently asked questions
Key Takeaways
| Point | Details |
|---|---|
| Comprehensive checklist | Use a detailed, standardized workflow that covers exterior, interior, safety, documentation, and digital records. |
| Photo evidence is crucial | Always capture clear, timestamped photos of key areas and tie them to inspection reports to avoid disputes. |
| Digitize for efficiency | Digital inspection solutions improve auditability, reduce errors, and streamline rental fleet operations. |
| Resolve discrepancies early | Address disagreements about damage or equipment before the renter departs to prevent financial losses. |
| Safety and compliance focus | Inspections protect your business not just from damage claims, but improve safety and regulatory compliance. |
What you need before every rental inspection
Having introduced the importance of a rigorous inspection process, let's outline exactly what you need to prepare for every inspection.
Before a single door is opened, your team needs the right tools and documents in hand. Showing up unprepared means rushed inspections, missed details, and paperwork that won't hold up in a dispute. Think of your pre-inspection kit as your first line of defense.
Essential inspection tools to have ready:
- A mobile device with camera capability or a dedicated digital camera for capturing clear, time-stamped photos
- Standardized condition report forms, either printed or loaded onto a tablet or app
- A flashlight for inspecting under bumpers, wheel wells, and poorly lit interior surfaces
- A calibrated tire pressure gauge to verify inflation levels against manufacturer specifications
- Cleaning supplies such as a microfiber cloth to wipe down glass or mirrors before photographing
- A copy of the vehicle's registration, insurance documents, and any existing damage log
Every item on the report should be marked with one of three statuses: Pass, Maintenance Required, or Not Applicable. This three-tier system removes ambiguity and makes it easier for supervisors to review completed reports quickly. A supervisor sign-off step is not optional—it creates a second layer of accountability that strengthens your documentation chain.
Don't forget to gather all vehicle keys, spare keys, fuel cards, parking passes, toll tags, and any accessories that are part of the rental package. Every item should be listed and confirmed on the condition report before the customer takes possession. If an accessory is missing at return, you need documentation showing it was present at pickup. Using a car rental software checklist to standardize this process across your team ensures nothing gets skipped regardless of who is conducting the inspection.
| Inspection item | Tool needed | Status options |
|---|---|---|
| Exterior body condition | Camera, flashlight | Pass / Maintenance Required / N/A |
| Tire pressure and tread | Tire gauge | Pass / Maintenance Required / N/A |
| Interior and equipment | Camera, checklist form | Pass / Maintenance Required / N/A |
| Fuel and odometer | Camera | Pass / Maintenance Required / N/A |
| Functional safety checks | Flashlight, engine start | Pass / Maintenance Required / N/A |
Pro Tip: Build a physical or digital pre-inspection kit that stays with each vehicle file. When your staff can grab a ready-to-go kit rather than assemble one from scratch, inspection times drop and audit quality improves significantly.
Step-by-step inspection process at pickup and return
With all tools and documents at hand, you can now execute each inspection with confidence and precision.
A consistent, repeatable process is what separates a defensible inspection from a rushed one. The goal is to move through the vehicle in a logical, standardized pattern that leaves no zone unchecked. Core inspection areas for every rental pickup include the exterior walkaround for body damage, the interior and equipment condition, fuel level and mileage, tires and wheels, and all functional safety items including lights, indicators, and wipers.
Pickup inspection: step-by-step workflow
- Begin with the exterior walkaround. Start at the driver's side front corner and move clockwise around the vehicle. Check all body panels, bumpers, mirrors, glass, and roof for scratches, dents, chips, or cracks. Photograph every angle, even panels with no visible damage.
- Check all four tires and wheels. Measure tire pressure against the recommended PSI listed on the door jamb sticker. Inspect tread depth, sidewalls for bulges, and alloy or steel wheel rims for curb damage.
- Move to the interior. Document the condition of seats, floor mats, headliner, dashboard, steering wheel, and all controls. Look for stains, tears, missing components, and odor issues.
- Record fuel level and odometer. Photograph the instrument cluster clearly. The fuel gauge needle and odometer reading must both be visible in a single image.
- Perform functional safety checks with the engine running. Verify that all exterior lights, turn signals, brake lights, reverse lights, and hazard lights are operational. Test the horn, windshield wipers, and parking brake. Check for dashboard warning lights including ABS, TPMS (tire pressure monitoring), and check engine indicators.
- Confirm all accessories and documents are present. Cross-reference your accessory list before handing over keys.
- Obtain a customer signature. Have the renter sign and date the completed condition report, acknowledging the documented vehicle state.
The return inspection follows the same sequence, with one key addition: you compare current condition against the pickup documentation side by side. Any new damage, missing accessories, or changes in fuel level or mileage beyond the expected range must be noted immediately. Using standardized inspection zones borrowed from commercial fleet practice—repeatable patterns, measured items, and recorded findings, even minor ones—builds a maintenance history and demonstrates due diligence if a dispute arises later.
Managers overseeing specialty or high-value vehicles will find that the same principles apply, though additional zones may be needed. Reviewing specialty vehicle rental automation practices can help you adapt the checklist for motorcycles, vans, or equipment rentals.
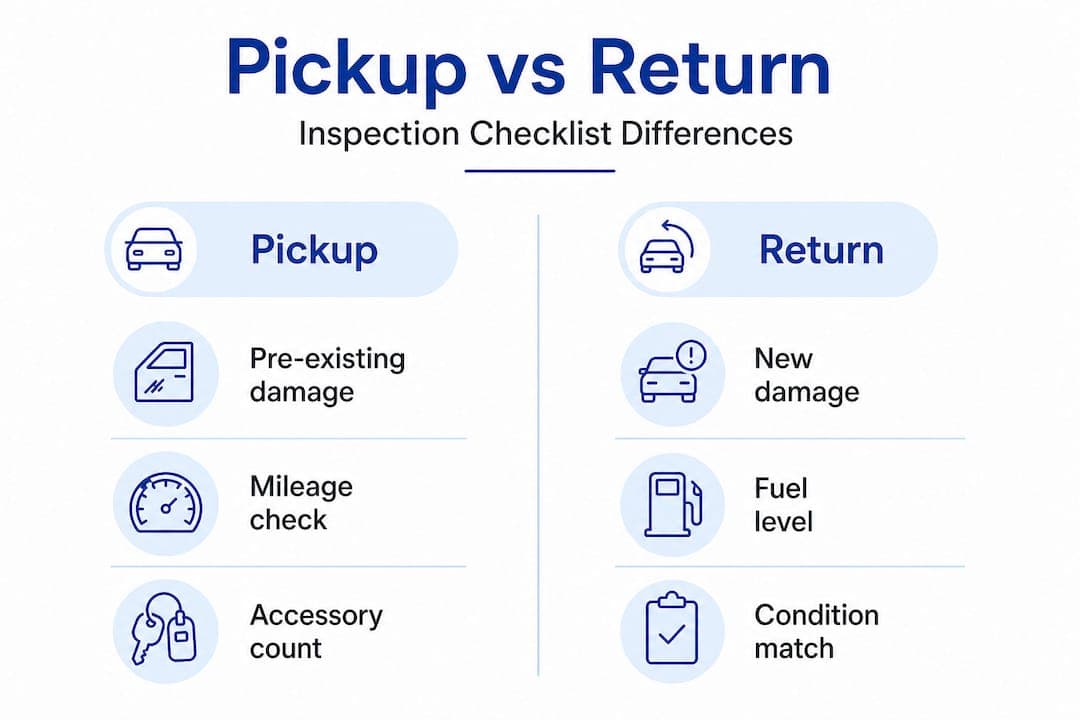
Pickup vs. return: key checklist differences
| Inspection point | Pickup focus | Return focus |
|---|---|---|
| Exterior damage | Document all pre-existing damage | Identify and record any new damage |
| Fuel level | Record starting level | Compare to contract requirement |
| Odometer | Record starting mileage | Calculate miles driven, check overage |
| Interior cleanliness | Baseline condition noted | Assess cleaning fees if applicable |
| Accessories | Confirm all items present | Confirm all items returned |
For teams managing multiple vehicles simultaneously, structured vehicle fleet management strategies help integrate inspection workflows directly into daily fleet operations, reducing bottlenecks at busy pickup windows.
Pro Tip: Complete pickup and return inspections while the customer is present whenever possible. A shared, real-time walkthrough dramatically reduces the chance of a dispute because both parties see and acknowledge the same evidence.
Documentation: protecting your business with proof
After inspecting the vehicle, protection shifts from observation to documentation—here's how to bulletproof your process.

A thorough inspection means nothing if the evidence doesn't exist or isn't usable. Documentation is where many rental businesses lose disputes they should win. The quality of your photos and reports determines whether you can recover damage costs or are forced to absorb them.
Best practices for inspection documentation:
- Photograph the instrument cluster first, showing both odometer and fuel gauge clearly in the same frame
- Capture all four sides of the vehicle, including roof and undercarriage where accessible
- Use natural daylight or a bright flashlight to eliminate shadows that obscure damage
- Take close-up shots of any existing damage with a reference object nearby for scale
- Never apply filters or edit photos in any way, as unaltered images carry more evidentiary weight
- Link every photo to the corresponding section of your condition report or diagram
Inspection evidence quality matters in practice: clear, time-stamped or location-tagged photos, an instrument cluster shot showing mileage and warning lights, and photos tied to condition report diagram markers give you a strong foundation. If you discover unrecorded pre-existing damage while still in the pickup area, request an amendment to the condition report on the spot before the customer drives away.
Strong documentation also supports your rental contract essentials by creating a clear, evidence-backed connection between the contract terms and the physical condition of the vehicle at each stage of the rental. You can also use free inspection checklist forms as a starting template before transitioning to a fully digital system.
"Disputes are far less likely when documentation is detailed, timestamped, and tied directly to the signed contract. A photo without a timestamp is a guess. A photo with a timestamp is evidence."
Pro Tip: Any unrecorded damage found at pickup must be reported and amended before the customer leaves. Once a vehicle exits your lot, proving that damage existed before the rental becomes exponentially harder without a paper trail.
Digital solutions: from manual checklists to audit-ready workflows
For teams ready to go beyond paper and manual files, digital inspection tools offer even greater protection and efficiency.
Paper-based inspection forms create friction: they get lost, they fade, and they require manual data entry after the fact. Organizations across the rental and fleet industry are increasingly adopting digitized inspection workflows with guided checklists, embedded photo capture, electronic signatures, and automatic timestamping to reduce disputes and standardize execution across all staff members.
Key digital features to look for in an inspection workflow:
- Guided checklists that prompt staff through each zone in a fixed sequence, reducing the chance of skipping steps
- In-app photo capture tied directly to each checklist item, so images are automatically linked to the correct report section
- Electronic signatures collected on-screen at both pickup and return
- Geo-location and timestamp tagging applied automatically to every photo and signature
- Audit trail generation that logs who completed the inspection, when, and what changes were made
- Integration with maintenance logs so flagged items automatically trigger a service ticket or maintenance alert
- Cloud storage ensuring reports are accessible remotely and never lost to a hard drive failure
The operational benefits extend beyond dispute resolution. Digital inspection data feeds directly into fleet management best practices, giving managers visibility into recurring damage patterns, maintenance trends, and high-risk vehicle or customer profiles. When this data is connected to a broader fleet management platform, it becomes a proactive management tool rather than a reactive one.
Digital inspections also support stronger fraud prevention strategies by creating tamper-evident records that are difficult to dispute after the fact. Combining digital documentation with regular attention to fleet vehicle maintenance keeps your vehicles roadworthy and your inspections accurate from the start.